Preparing Your Vehicle for Paint Correction: A Step-by-Step Guide
If you’re a North Jersey car owner who loves keeping your vehicle spotless, you already know how frustrating it is to notice swirl marks, dull spots, or fine scratches under the sunlight. Maybe you’ve watched countless YouTube videos on paint correction, but you’re unsure where to start, or worse, worried you’ll make things worse with the wrong tools. This article provides tips on preparing your car for paint correction at home to keep your car’s paint fresh for a long time.
Understanding Paint Correction and Why Prep is Essential
Paint correction is the process of removing surface imperfections such as swirl marks, oxidation, and light scratches through polishing and compounding. But the success of paint correction depends almost entirely on how well you prep your vehicle beforehand.
If dirt, road salt, or embedded contaminants remain on the surface, your polishing pads can drag them across the paint, causing even more micro-scratches. Proper preparation ensures the paint is clean, smooth, and ready for correction without damage.
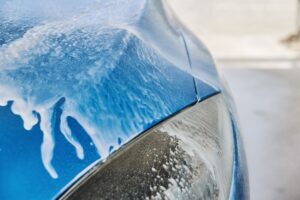
Step 1: Start with a Thorough Wash
Begin with a complete hand wash using a high-quality pH-balanced car shampoo. In North Jersey, cars often collect winter salt and grime, which cling stubbornly to lower panels and wheel wells.
Use the two-bucket method, one for clean, soapy water and one for rinsing your mitt to avoid re-introducing dirt. Rinse thoroughly from top to bottom, and don’t forget to clean hidden spots, such as door jambs and emblems.
Step 2: Decontaminate the Paint Surface
Even after a good wash, your paint likely still has embedded contaminants such as iron particles, tar, or tree sap. This is where chemical and mechanical decontamination come in:
Iron remover: Dissolves industrial fallout and brake dust. Watch for the purple bleeding effect.
Clay bar treatment: Gently glide a lubricated clay bar over the surface to pull out remaining contaminants.
After claying, your paint should feel smooth like glass. Skipping this step can leave residue that scratches during the correction process.
Step 3: Dry and Inspect Under Proper Lighting
Use clean microfiber towels or a dedicated car dryer to remove every drop of water. Then inspect your paint in good lighting, such as sunlight, a garage light, or a handheld LED. Look for swirl marks, hazing, and deeper scratches.
Mark problem areas with small pieces of painter’s tape. This provides a roadmap when you begin correction, helping you focus on where it’s needed most.
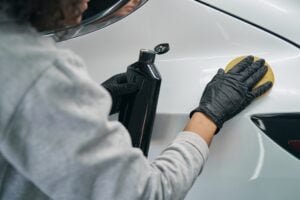
Step 4: Mask Sensitive Areas
Before you fire up the polisher, protect plastic trims, rubber seals, badges, and edges with masking tape. This prevents polish residue from staining porous materials and keeps buffer pads from catching edges.
It might seem tedious, but taping saves time and frustration later, especially around emblems and headlights.
Step 5: Choose the Right Environment
Paint correction shouldn’t be rushed in a dusty driveway at noon. Pick a shaded area or closed garage with good ventilation. Avoid direct sunlight, which can dry products too fast.
In humid North Jersey weather, maintaining controlled conditions helps your compounds and pads perform consistently.
Step 6: Gather the Right Tools and Products
You’ll need:
- Dual-action polisher (DA)
- Polishing pads (cutting, polishing, finishing)
- Compound and polish designed for your paint type
- Microfiber towels for residue removal
Read each product label carefully. Many over-the-counter compounds are designed for hand use, while professional-grade versions require machine application.
Step 7: Final Wipe-Down Before Correction
Just before polishing, wipe the paint with a mix of isopropyl alcohol (IPA) or a dedicated panel prep solution. This removes oils, waxes, and any leftover residues that could interfere with correction results. The surface should feel clean, slick, and ready to work on.
Common Mistakes to Avoid
- Using dish soap or harsh degreasers for washing
- Skipping the clay bar step
- Working in direct sunlight or high heat
- Rushing without proper lighting
- Forgetting to tape delicate areas
Each of these can create more harm than good, leaving holograms, marring, or uneven gloss that takes hours to fix.
When to Call the Pros
If your paint has deep scratches, heavy oxidation, or if you’re unsure which compounds to use, it’s safer to let a professional detailer handle it. CAB Detailing NJ brings everything, water, power, and years of expertise right to your driveway.
We handle complete exterior detailing and paint correction with the right equipment and professional-grade products so you don’t risk burning or thinning your paint.
Final Thoughts
Prepping your car correctly is half the battle in achieving a flawless paint correction. Take your time, follow each step, and you’ll see a massive improvement in clarity and gloss. But if it feels like too much to tackle on your own, call in the pros.
CAB Detailing NJ delivers mobile detailing across Morris County with the right tools and techniques to keep your car looking its best, without the hidden dangers. Call us today at 862-260-4178, and we’ll come to you with everything needed to restore shine, protect your investment, and give your vehicle a cleaner, longer-lasting finish you can be proud of.
FAQs
How to prepare a vehicle for paint repair?
Clean the surface completely, remove old wax or sealant, and sand or decontaminate the affected area. The goal is to ensure the surface is smooth, dry, and free from dust or grease before applying touch-up or correction products.
How to correct car paint at home?
Use a dual-action polisher with the correct compound and pads after thoroughly preparing the surface. Work in small sections, apply light pressure, and finish with a polish or wax to restore shine and protect the paint.
Should you wash your car before paint correction?
Absolutely. Washing removes loose dirt and grime that can scratch the surface during the correction process. Always start with a clean, decontaminated surface for the best and safest results.